-40%
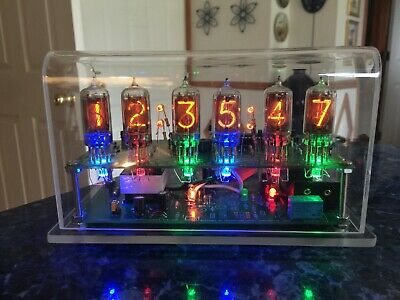
Homemade 6 digit Nixie clock NL-840 RGB led gps wifi connection & battery backup
$ 187.43
- Description
- Size Guide
Description
MADE IN THE USAThese tubes are in pin connectors, not soldered in so they can be easily unplugged for replacement.
Wifi or GPS module included for network connection which enables
automatic
time & date set
Uses all standard size components (not surface mount "throwaways") so it can actually be repaired as opposed to other designs.
The microcontroller and decoder chips are in sockets for easy replacement.
The RGB leds make it possible to produce different color backlighting, user selectable. Just press & hold the led color button.
Nixie National NL-840 84X nixie clock - YouTube
Battery backup included using 9 volt battery.
A six - digit Nixie clock using NL-840 nixies with RGB led backlighting. The enclosure is plexiglass, homemade from 1/8" & 1/4".
Homemade, not a commercial product. Below are the operating instructions. User selected 120VAC (U.S. standard) or 240VAC (some other countries)
I will ship it anywhere in the world, but I cannot be responsible for problems
and/or delays caused by customs in your country. International buyers, please
send your address for a shipping quote.
It is an entirely homemade novelty craft project from my workbench.
Outside dimensions are about 8" W x 6" H x 4" D. Battery backup uses a nine volt battery.
Calendar with leap years built in until 2100, can be set to display MM/DD/YY every minute on seconds count 50-53.
User programmable sleep/wake function, to turn the display on/off at preset times, in order to conserve tube life.
Rudimentary alarm buzzer can be set for alert once per day on hour.
Nixies "fade" when changing (numbers "melt/morph" into next number) as opposed to just changing instantly.
Made entirely from repairable/replaceable parts, IC's are socketed for easy replacement.
GPS / WiFi module enabled automatically sets time & date
___________________________________________________________________________________________________________________________________
Instruction set for Nixie clock
Note: if your clock has battery backup, in order to start from this point you should:
1) unplug the cord
2)unplug the battery
3) plug cord back in
4) plug battery back in
When plugged in, the blue led should light immediately and the display will read 11:11:11 for five seconds. To enable gps to auto set the time, press fast set once and the display will change to 33:33:33. To select a time zone, press LED COLOR button and the middle tube will display “1”. Press fast set to cycle through the time zones. When the correct number corresponding to the time zone needed is selected from the list below, press slow set twice to return to setup.
The display will change after a few seconds to 00:00:00. To enable the calendar to display, press either fast set or slow set once, and the display will change to 22:22:22 for three seconds. This means the calendar has been enabled.
Next the display will read “11:11” while the firmware detects the frequency automatically (60HZ, 50HZ or 1PPS)
The tubes should then display 1:11 for three seconds for 60HZ, or 0:00 for 50HZ. If the wrong frequency was erroneously detected, unplug, wait until the blue led goes off, and then plug back in.
Next the tubes should display: 12 (12 hour format, the default setting) for three seconds. To choose 24 hour format, press the fast set button once, and the display should be: 24 for three seconds, then display will show 1:00:00 (or 12:00:00 if 12 hr. format) and normal time keeping begins, set buttons operate as fast set / slow set, (hours / minutes).
*If the gps auto set is enabled, the date will already be set at this point.
To set the calendar date: Press and hold fast set, then press and also hold the led color button (button in the back) at the same time, and the date will fast set. Release the led color button, but hold the fast set, and the date will display until fast set is released. Next hold down slow set & led color to slow set the date. Again, release led color while still holding down slow set and the date will display until slow set is released. The date should appear on the second’s count of 50 to 53. It is in mm/dd/yy format. Please refer to the youtube for illustration:
youtube demo
To manually turn the display on/off , push the button in the back ( toggle )and hold for no longer than one second until the display toggles.
To program the preset on/off times from normal time keeping mode: Press both buttons and the display will blank. Press the fast set button to increment hours to the desired on time ( : 1 after the hour indicates AM , : 0 indicates PM ) .Press slow set to confirm your choice , and the hour you selected will appear with :00 for PM , :11 for AM. To set the alarm for this time, press fast set again, and “1” will be displayed on the last nixie. (xx:xx:x1 ) Please refer to youtube for illustration:
alarm demo
Press either button once to enter the OFF time set mode. Follow the same procedure, and after the OFF time is confirmed (: XX appears after the hour selected), press slow set button to enter normal timekeeping (fast set, slow set) mode. To program a second set of sleep / wake times, press fast set and repeat the procedure for a second time. Please refer to the youtube link for illustration:
2nd on/off times setup demo
Note : The clock will display 12:00 AM to start (1:00 AM if in 24HR mode) so if the present time is after noon, you will need to advance the time past 12:00 in order to reach the PM hours (if in 12 HR mode) else the preset on/off times may be reversed. I.E.: if the present time is 8:00 PM, you need to advance PAST 8:00 once, then stop at 8:00.
To change the color of the led underlighting, press the ledcolor button until the color changes. If the button is held, it will cycle through all the color choices until it returns to blue (default color).
Time zone 1 ; EST
Time zone 2; CST
Time zone 3; MST
Time zone 4; PST
Time zone 5; AKST
Time zone 6 ; HAST
Time zone 7; BST
Time zone 8; CEST
Time zone 9; MSK
Time zone 10; PHT
Thanks again for your purchase !
